 Aureole
 help.
To get started, get unstuck and discover every feature, guide by guide.
Get started. Five steps to follow in order, each one detailed in its guide.
Check off each step once it’s done: your progress is kept in this browserInstall Aureole
Download Aureole, install it, then follow its welcome screens on first launch.
- Open the DMG file you downloaded.
- Drag the Aureole icon onto the Applications folder.
- Launch Aureole: its welcome screens guide you step by step.
Allow Aureole to act
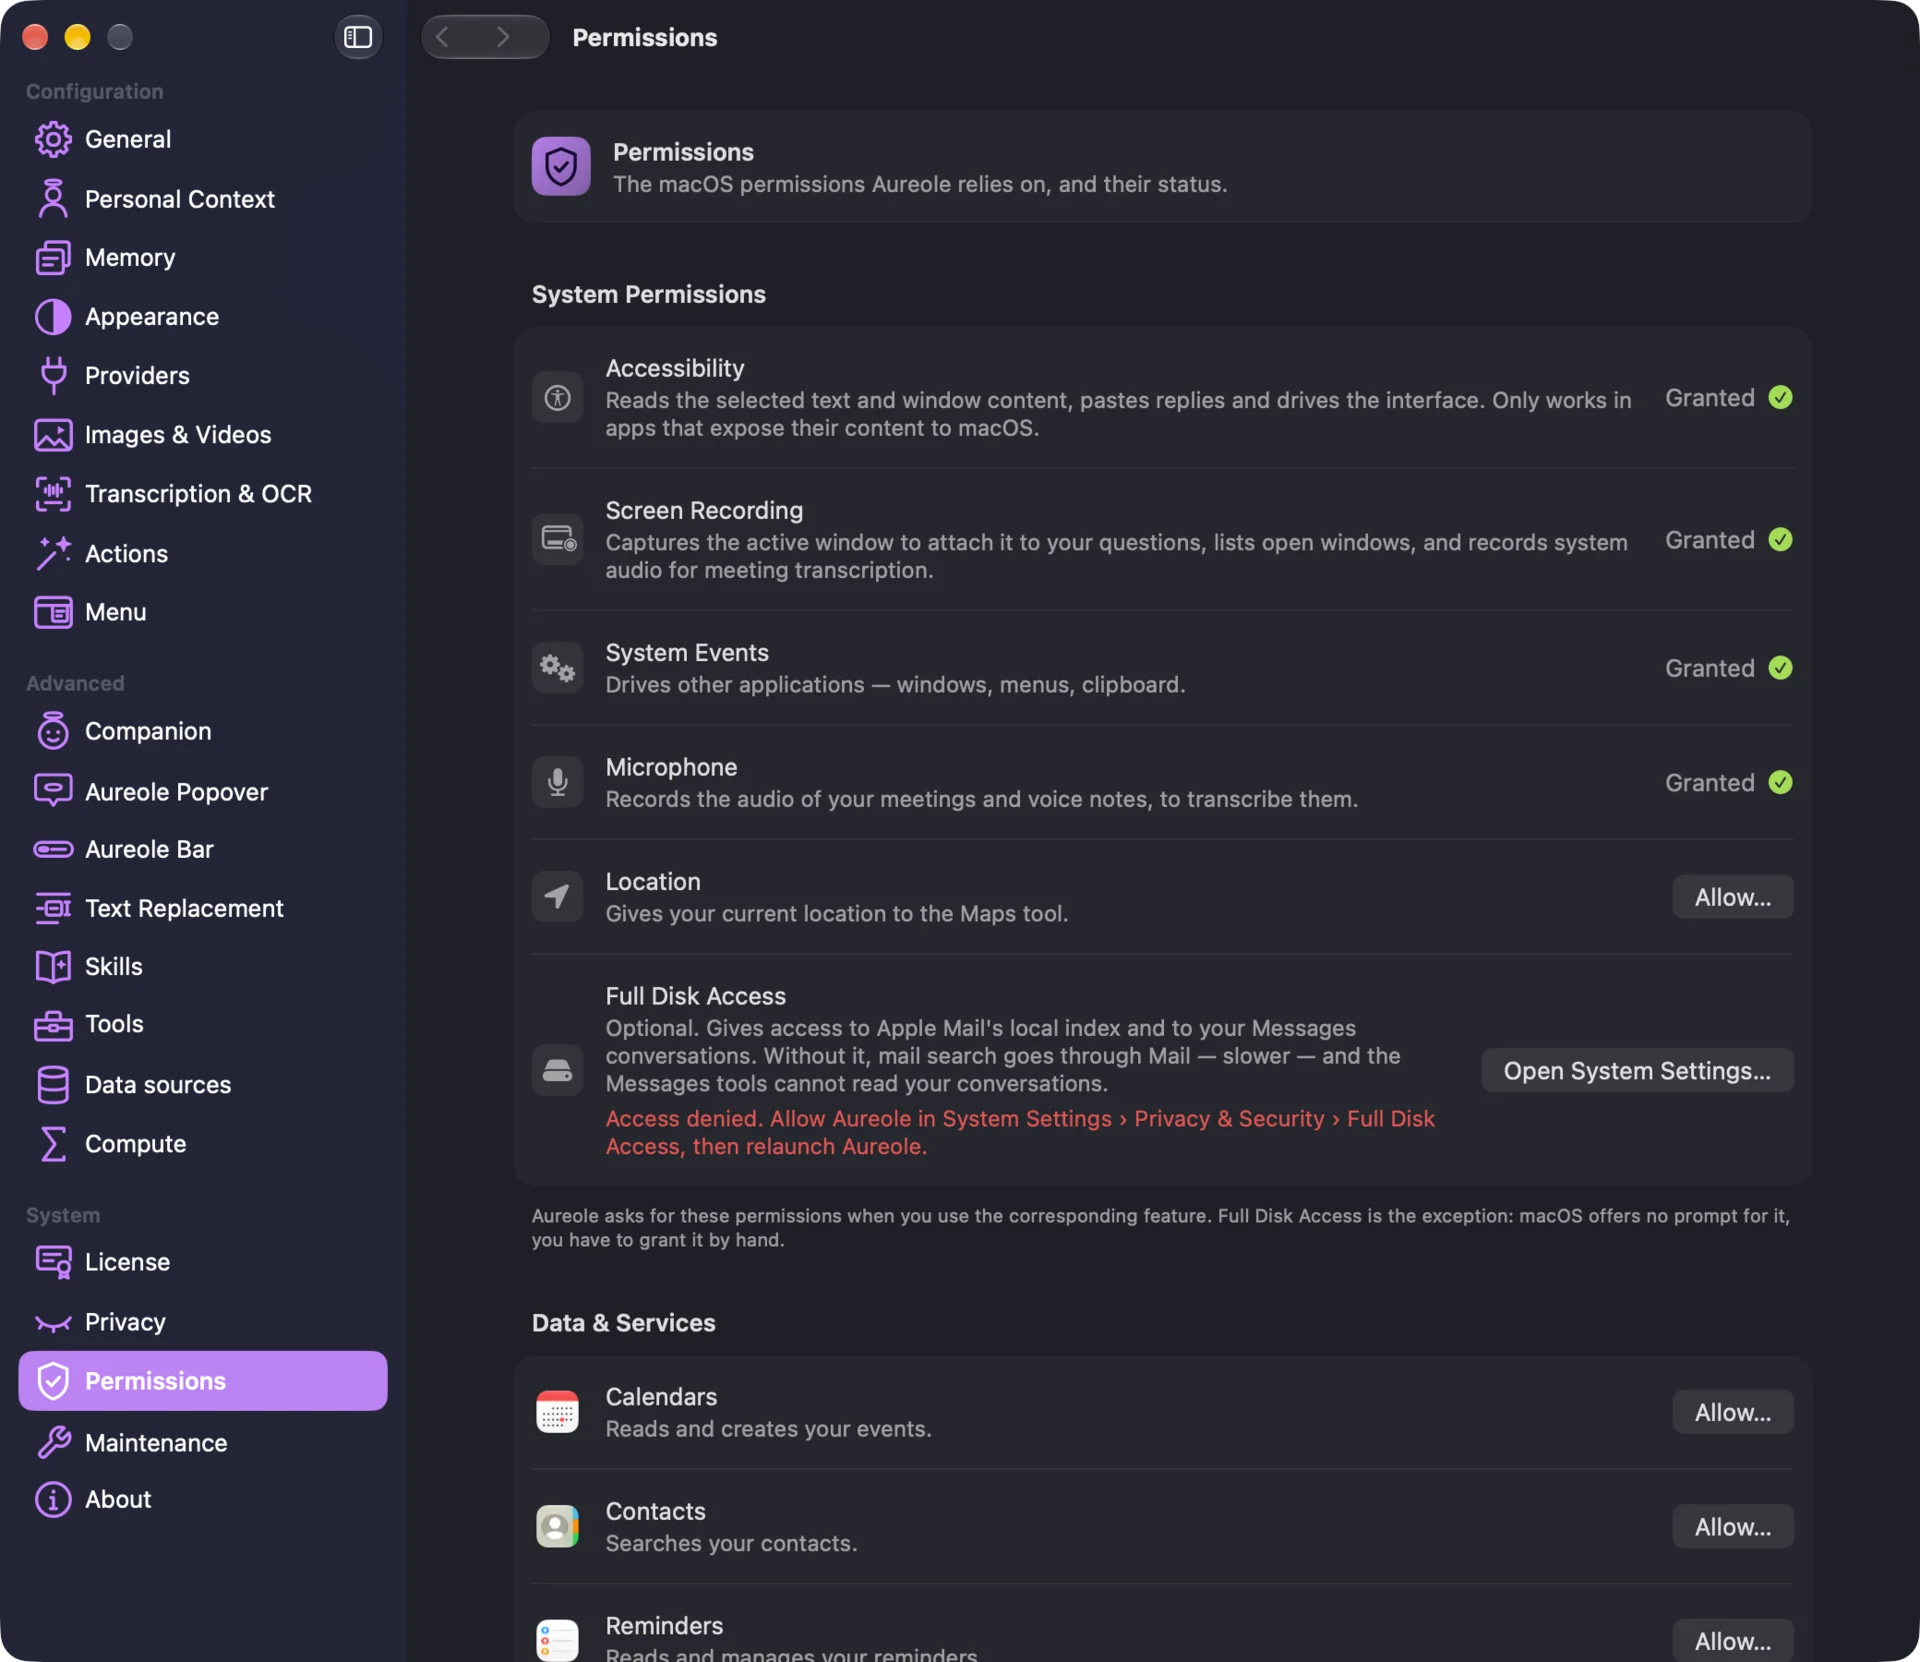
macOS asks for your consent, one permission at a time.
- “Accessibility”: it lets Aureole read your selection. It’s the only one you need.
- For Aureole to drive an app such as Mail, Notes or Safari, macOS asks for your consent, once per app.
- The other permissions are requested when a feature needs them.
Add an API key
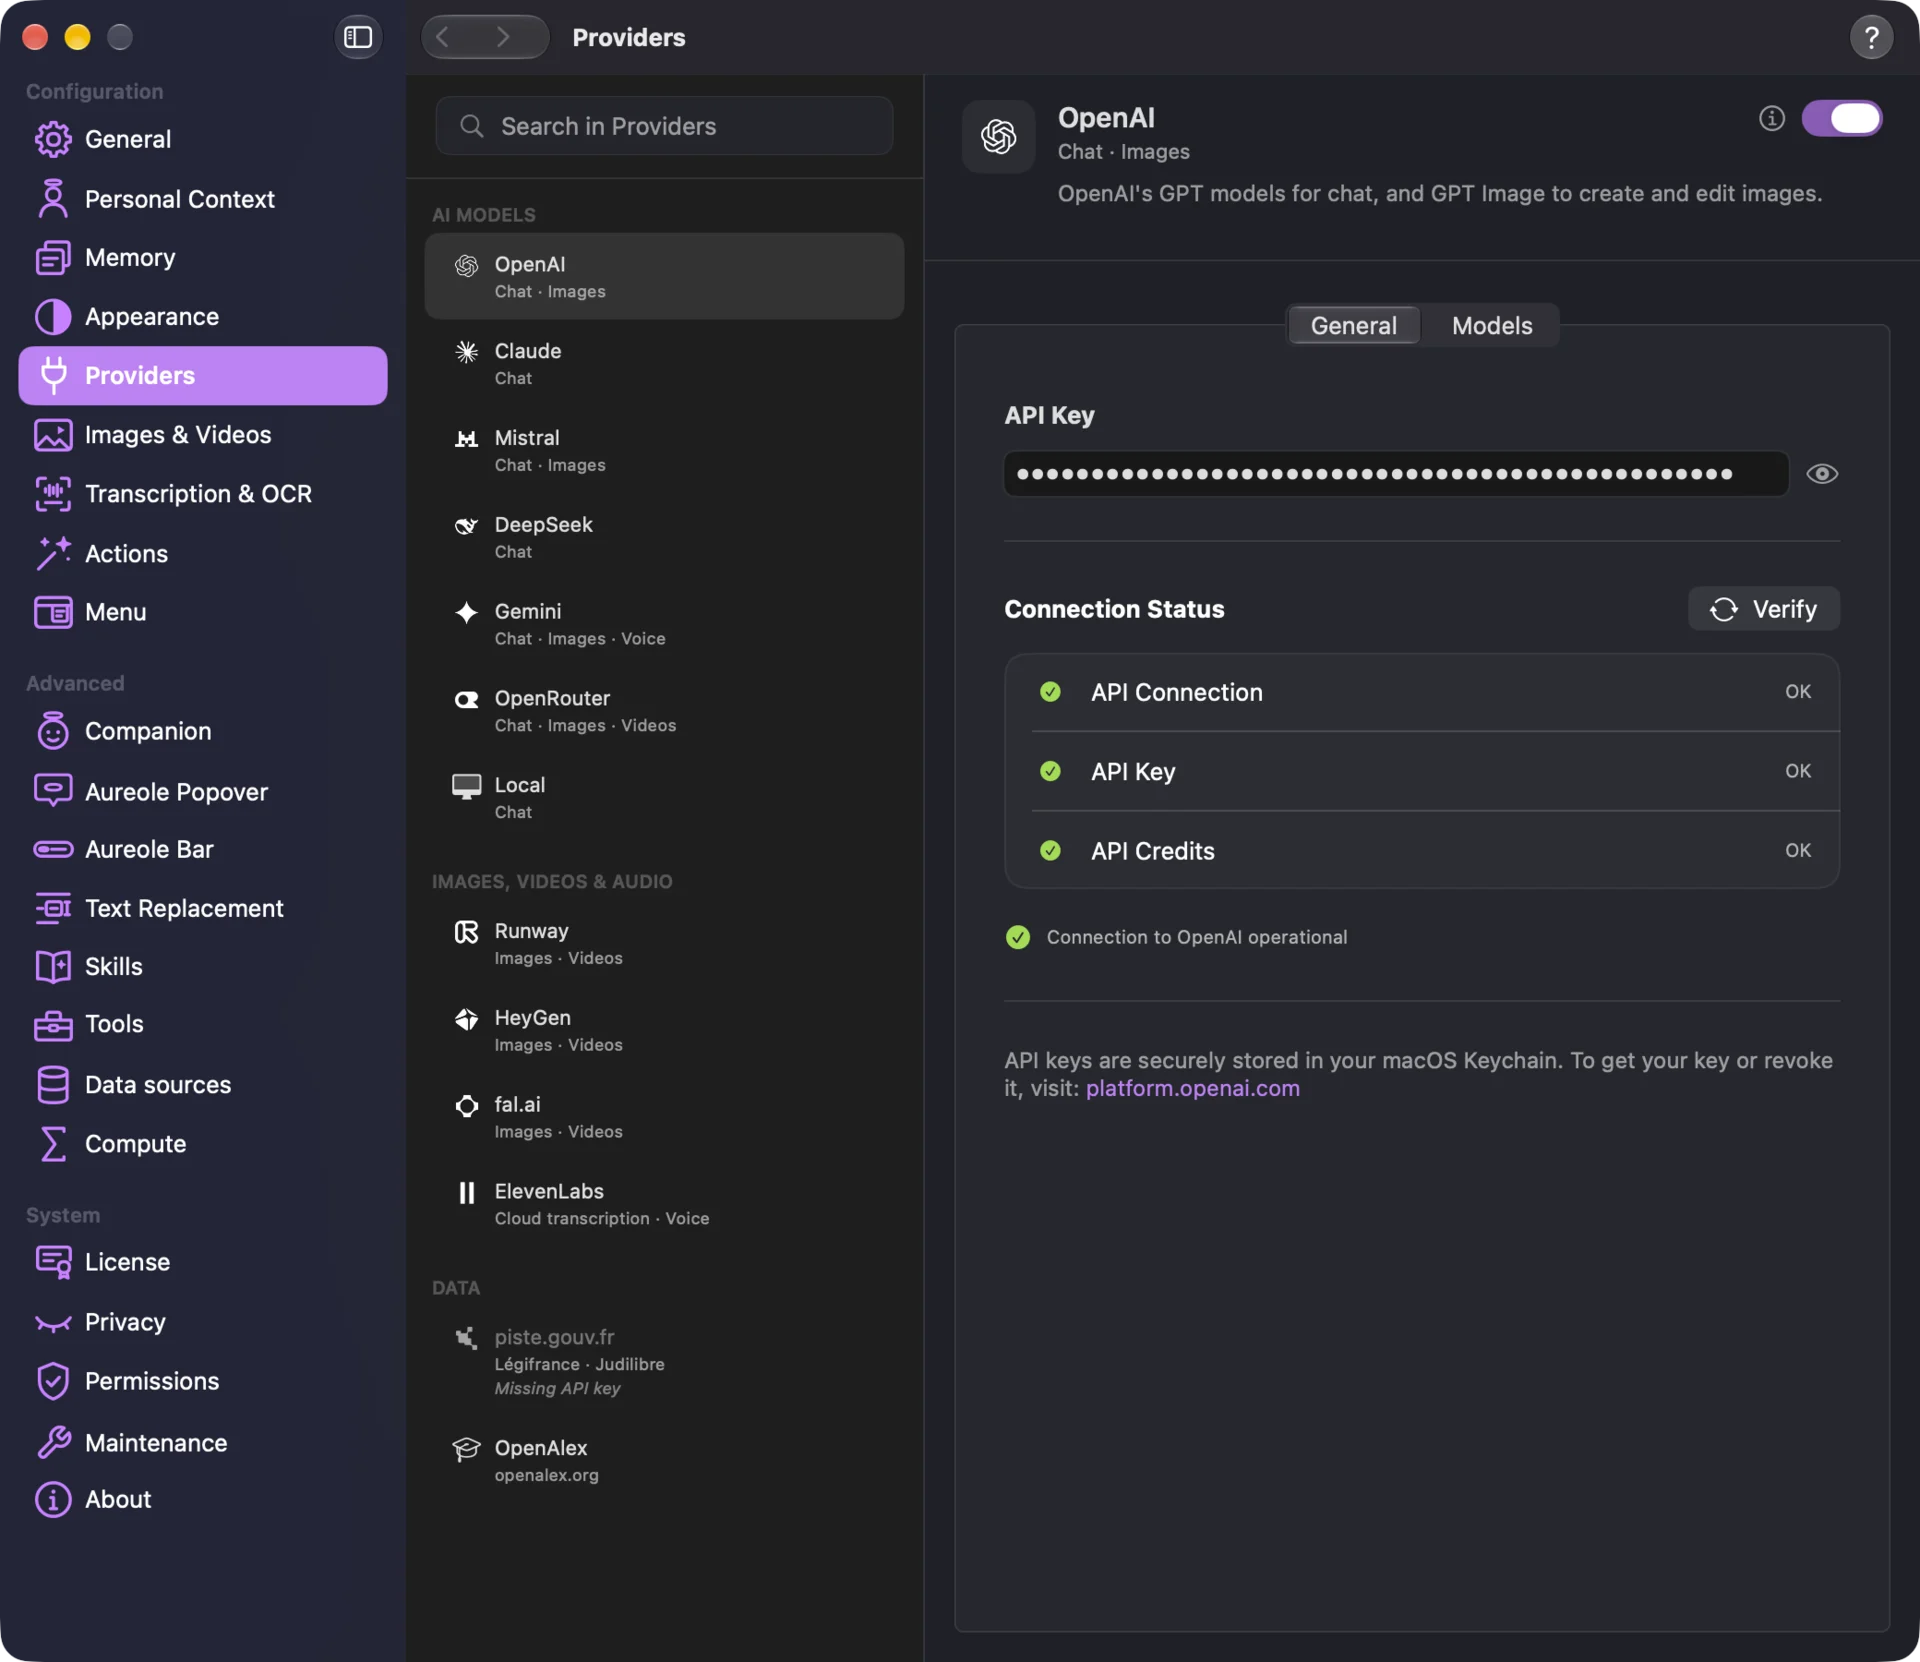
One key per AI provider, kept in your Mac’s Keychain.
- Create a key on your provider’s keys page, for example platform.openai.com/api-keys↗ for OpenAI or platform.claude.com/settings/keys↗ for Claude. The guide gives the addresses for all ten providers.
- Paste it in Settings›Providers
- Aureole checks right away that the connection works.
Discover the Aureole Bar
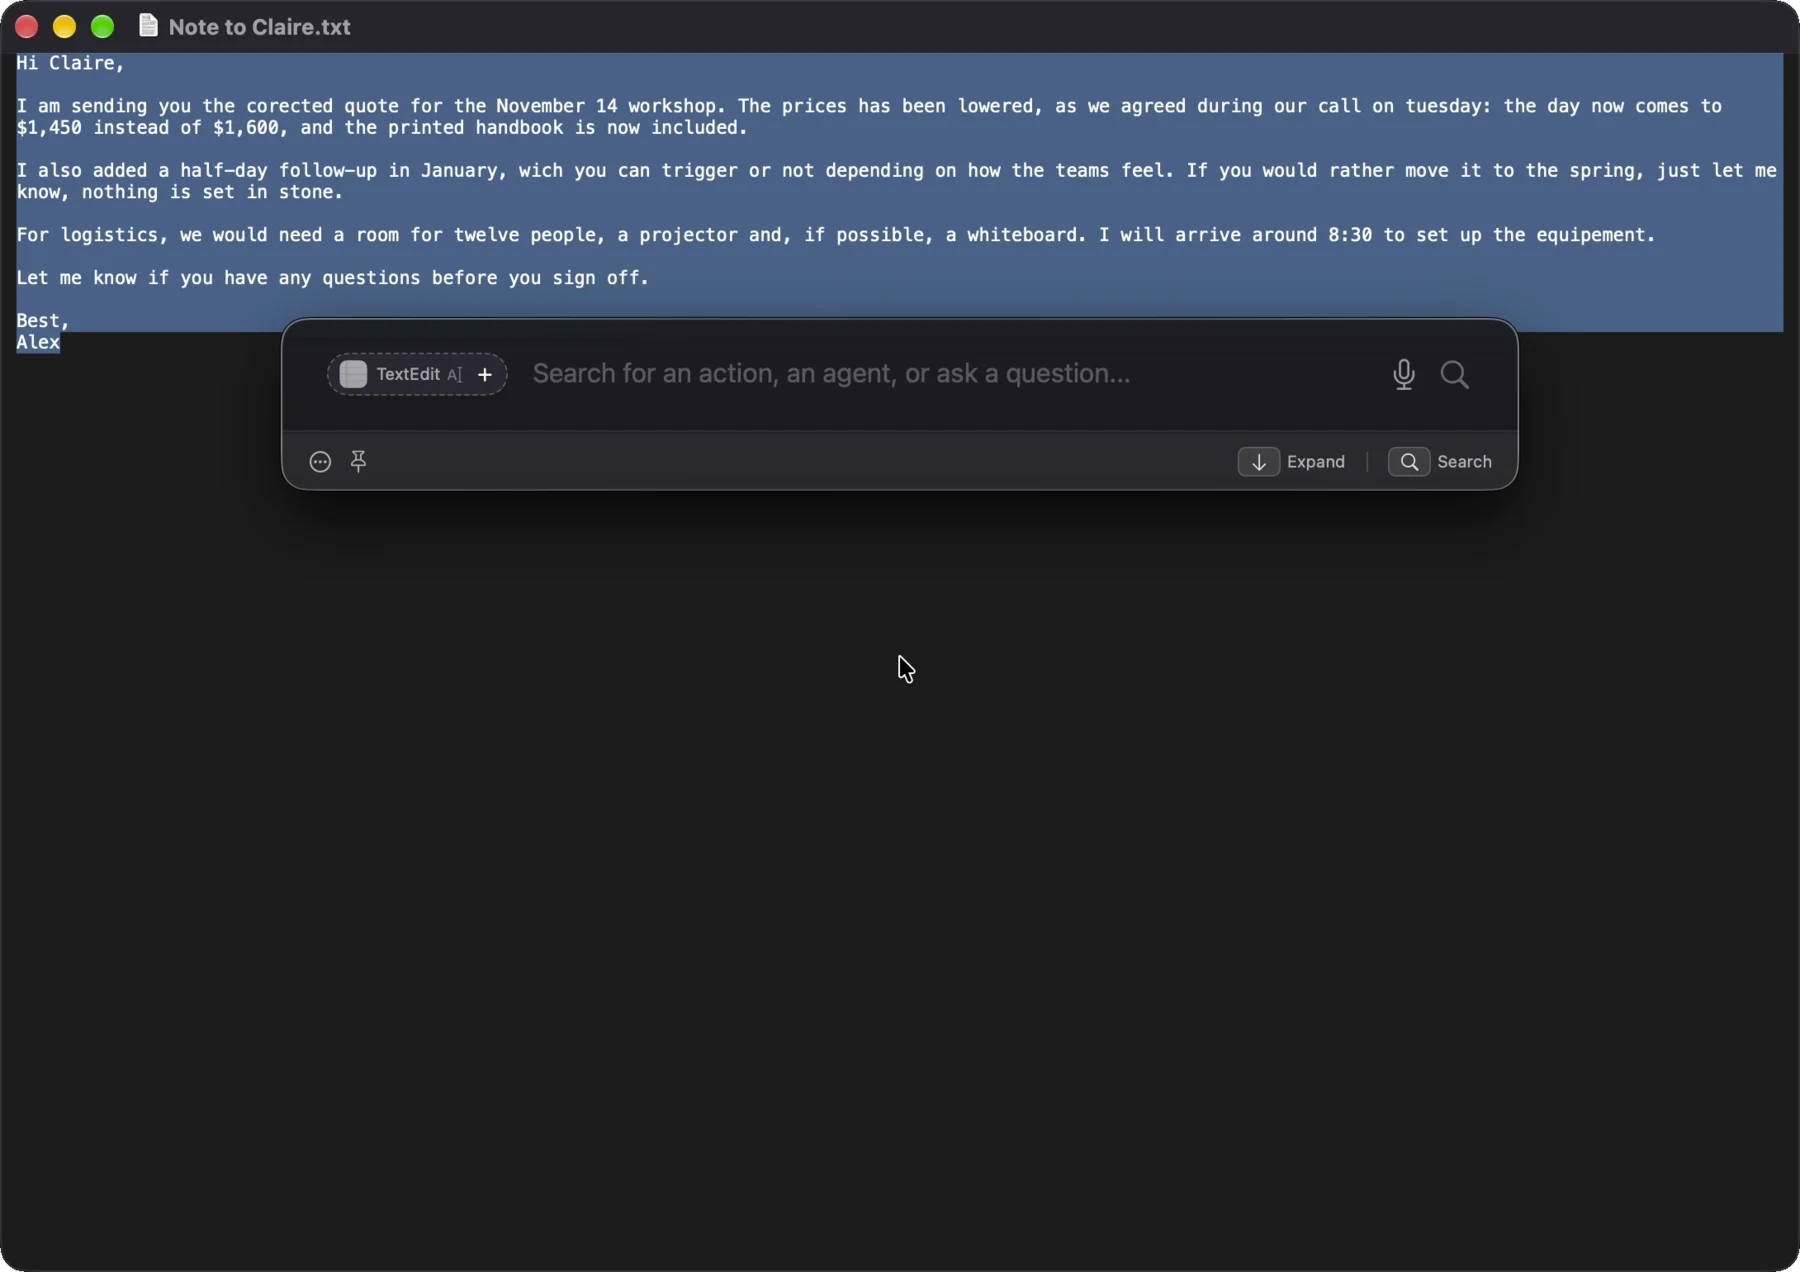
What it shows, before you use it.
- It opens over your app in its compact form: a field, with the useful keys underneath.
- To the left of the field, the pill shows what the bar spotted in your app, such as selected text.
- The ↓ key expands it: actions, agents, apps.

Your first ⌥Space
Run an action or ask a question from any app.
- Press ⌥Space from any app, with or without a selection.
- The bar spots what you’re looking at: selected text, files in the Finder, a web page, an email or a window.
- Run an action on that content, or ask a question. For the question to take it into account, click the pill first; otherwise, it goes on its own.

Next: add an MCP server to plug in one more tool.
Troubleshoot. Choose what isn’t working: you’ll find out why, and what to do.
Another app is probably already using this shortcut.
A launcher, a window manager or another assistant may be using ⌥Space before Aureole.
- Free the shortcut in the app that uses it, if you know which one.
- Or choose another shortcut for Aureole: Settings›General, Shortcuts section, “Aureole Bar” row.
Still stuck? In Aureole, open Settings›About and click “Contact Support”: an email opens, already filled in with your Aureole and macOS versions, which helps us understand the problem. You can also write to us from the website.
It’s missing the Accessibility permission, or the source isn’t attached.
Without Accessibility, macOS lets no app read what you’ve selected elsewhere. With it, the bar offers your selection, but only sends it if you attach it.
- Open Settings›Permissions
- On the Accessibility row, click “Allow…”: macOS opens its settings, where you turn Aureole on.
- Is the pill dotted? The selection is only offered: click its “+” to attach it.
Still stuck? In Aureole, open Settings›About and click “Contact Support”: an email opens, already filled in with your Aureole and macOS versions, which helps us understand the problem. You can also write to us from the website.
Aureole isn’t allowed to drive Mail.
macOS asks for this permission only once per app, the first time Aureole drives it, and doesn’t ask again after a refusal.
- Open System Settings›Privacy & Security›Automation
- Check Mail under Aureole.
- Run your request again.
Still stuck? In Aureole, open Settings›About and click “Contact Support”: an email opens, already filled in with your Aureole and macOS versions, which helps us understand the problem. You can also write to us from the website.
The provider refuses the API key.
The connection status gives the reason: “Invalid key”, “Credits exhausted”, “Key spending limit reached”…
- Open Settings›Providers and read the connection status.
- Invalid key: paste it again, or create another one at the provider.
- Credits exhausted: top them up on the provider’s website, where the “View billing” link takes you.
Still stuck? In Aureole, open Settings›About and click “Contact Support”: an email opens, already filled in with your Aureole and macOS versions, which helps us understand the problem. You can also write to us from the website.
You can run the check yourself.
Aureole checks for updates once a day, but you can run the check at any time.
- Open Settings›About, then click “Check for Updates…”. The same command is in the Aureole menu.
- If the message “Update ready — installed at next launch” appears, quit Aureole and launch it again.
Still stuck? In Aureole, open Settings›About and click “Contact Support”: an email opens, already filled in with your Aureole and macOS versions, which helps us understand the problem. You can also write to us from the website.
The license is activated in the “My Account” window.
There are two possible cases: the license key hasn’t been entered yet, or it’s already active on every Mac it covers.
- Open Settings›License, click “Open My Account…”, then “I already have a key…”, and paste the key you received by email after your purchase.
- If it’s already active on every Mac it covers: on the old Mac, click “Deactivate on This Mac…”, then activate it on the new one.
Still stuck? In Aureole, open Settings›About and click “Contact Support”: an email opens, already filled in with your Aureole and macOS versions, which helps us understand the problem. You can also write to us from the website.
In the manualSend a diagnostic to supportCheck that a provider respondsFree up memory and reset
The manual. Every feature, guide by guide.
Written: 59 of 59Get started
Install Aureole and succeed with your first ⌥Space.
- Install AureoleDownload Aureole, install it, then follow its welcome screens on first launch.4 min read →
- Allow Aureole to actWhat each permission lets Aureole do, and how to grant it.4 min read →
- Add an API keyConnect Aureole to an AI provider, with a key kept in your Mac’s Keychain.4 min read →
- Discover the Aureole BarIts two forms, what it shows, and how to use it from the keyboard.6 min read →
- Your first ⌥SpaceBring up the bar on top of your app, and act on what you’re doing.6 min read →
Act in your apps
The bar, the context it attaches, and where the answer goes.
- Attach the right contextGive the bar your selection, the window, the web page, the email or the files to work on.7 min read →
- Choose where the answer goesReplace the text in the app it came from, read the answer in the bar, or carry on in the window.6 min read →
- Run an actionFind one of Aureole’s actions in the bar, run it on what you’re looking at, and add it to your favorites.5 min read →
- Create your own actionsWrite an action of your own: its prompt, its model and where its answer goes.4 min read →
- Customize the actions menuArrange your actions into submenus and separators, in the menu the bar and the popover share.4 min read →
- Search from the barSend a question to the AI, or search the web, Aureole or your Mac, and the commands that start with “/”.5 min read →
- Act on a selection without the shortcutSelect text: a small Aureole icon appears near the pointer, and opens your actions with one click.4 min read →
- Dictate your requestDictate into Aureole’s bar or window, from any app, transcribed on your Mac.5 min read →
- Change the shortcutChoose another combination for the bar, Aureole’s window or dictation, for example if another app already uses yours.3 min read →
- Call Aureole from ShortcutsAureole’s actions in the Shortcuts app, the Services menu, and aureole:// links.4 min read →
Converse
Aureole’s window, your conversations and what they become.
- Work in Aureole’s windowOpen it, choose its layout, and what its welcome screen and each of its parts show.5 min read →
- Keep Aureole alongside: Companion modeA floating window that stays next to your work and tucks against the edge of the screen.4 min read →
- Give files, a window or a folderAttach files, a window’s content, or a working folder to a conversation in Aureole’s window.5 min read →
- Search the web and let the model thinkTurn on web search and its options, and set how much a model thinks before answering.4 min read →
- Read and export widgetsWhat a response’s widgets are, and how to copy them, save them or keep them in the Library.3 min read →
- Resume, correct, regenerate an answerStop an answer, edit your message, ask for another answer, and reply to the questions Aureole asks you.4 min read →
- Organize and find your conversationsFavorites, archives, folders, tags and search: organize your conversations, and find them again.4 min read →
- Export a conversationSave a conversation as PDF, Word, Markdown or an image, or turn it into a document to rework.3 min read →
Choose your models
Which model, which one by default, and what it costs you.
- Choose a modelWhich model to choose to write, search, analyze an image or code.4 min read →
- Switch modelsSwitch models mid-conversation, keep your favorites, and set the default model or an action’s model.4 min read →
- One key for all: OpenRouterSign in with OpenRouter to use models from several providers with a single account.4 min read →
- Work with a local modelRun models on your Mac with Ollama or LM Studio, with no API key and no account.4 min read →
- Keep your spending in checkTrack your spending, and set a limit with each provider.4 min read →
Connect your tools
The apps on your Mac, your accounts, MCP servers.
- Use the apps on your MacTwenty-seven apps driven directly, and the others through what the screen shows.4 min read →
- Add an MCP serverPlug new tools into your AI, with a command or an address.4 min read →
- Query data sourcesQuery public reference sources from your questions.4 min read →
- Add a skillImport a folder that contains a SKILL.md file to teach Aureole a way of working.4 min read →
- Compute and draw chartsLet Aureole compute in Python on your Mac, and add the packages your calculations need.4 min read →
- Let Aureole control the screenScreen control: Aureole clicks and types for you, and you can see when it is in control.3 min read →
- Decide what Aureole may do on its ownAsk before every action, allow or deny a tool once and for all, and choose a conversation’s tools.4 min read →
Create
Images, videos, transcripts, music, documents, voice.
- Generate and retouch an imageCreate an image, then transform it, retouch it, upscale it or remove its background.5 min read →
- Generate and transform a videoCreate a video, transform it, upscale it, subtitle it or compose music for it.5 min read →
- Transcribe audio, a video or a meetingImport a file or a URL, or record a meeting, then transcribe it on your Mac or online.5 min read →
- Make the most of a transcriptTurn it into subtitles, events and reminders, or a publishing pack.4 min read →
- Compose music and lyricsWrite lyrics, set them to music, then extend, restyle or split the stems of a track.5 min read →
- Write and revise a documentWrite, have the AI revise it while you accept each change, find past versions and export.5 min read →
- Have a text read aloudNarration: choose, design or clone a voice, and export the reading of a document.5 min read →
- Choose the engine for each creationDecide which provider generates, retouches or transcribes, operation by operation.4 min read →
Delegate to agents
Tasks that run on their own, and their reports.
- Create an agentDescribe a task in one sentence, or start from a template: morning briefing, press review, expense report…5 min read →
- Choose when an agent runsOn demand, at a set time, before an event, when an email arrives, or when a folder changes.5 min read →
- Get an agent’s resultsWhere its reports land, and how to receive them by Mail, iMessage, Reminders or Calendar.4 min read →
- Monitor and adjust an agentRead its history and health, run it or pause it, and why Aureole must stay open.4 min read →
Personalize
What Aureole knows about you, and how it looks.
- Tell Aureole who you areYour name, your occupation, the tone you prefer, and the instructions it follows on every request.4 min read →
- Manage what Aureole remembersSee, correct or delete its memories, and keep some for local models only.5 min read →
- Set the appearance, language and regionThe theme, the message font, the app’s language, and the region that picks local sources.4 min read →
Protect your data
What leaves your Mac, and what never does.
- Know what leaves your MacYour work goes through no Aureole server: what goes to the model’s provider, what stays on your Mac, and how to check.5 min read →
- Keep a conversation private or lockedA conversation nothing is remembered from, or one that opens only with Touch ID or your password.4 min read →
- Choose where your files are keptChoose the folder where Aureole keeps your files, and move them there.4 min read →
Manage your license
Activate it, move to a new Mac, update.
- Activate your licenseEnter the license key you received by email, in the My Account window.4 min read →
- Move to a new MacDeactivate the license on the old Mac to activate it on the new one, and recover a lost key.3 min read →
- Update AureoleHow Aureole updates, and what your license covers.3 min read →
Troubleshoot
What isn’t working, and what to do.
- Send a diagnostic to supportExport Aureole’s logs, and write to us with the versions already filled in.2 min read →
- Check that a provider respondsRead a connection’s status, open the provider’s status page, and follow the tasks that failed.2 min read →
- Free up memory and resetThe maintenance tools, and putting a setting back to how it was.2 min read →